Procédure en anglais pour créer un nouveau réseau wifi proprsimproboeme persiste faut changer la carte wifi
Creating a New Wi-Fi Configuration in macOS High Sierra
Back up your Mac before continuing, these steps involve removing system level configuration files. Do not proceed without a backup made so that you can roll back if something goes wrong.
First, turn off wi-fi by pulling down the wi-fi menu bar item in the upper right corner and selecting “Turn Wi-Fi Off”
From the Finder, create a new folder onto the desktop (or another user folder) and call it something like “WiFiConfigBackup”
Go to Finder in macOS, and pull down the “Go” menu, then choose the “Go To Folder” option
Enter the following directory path into window and then click on “Go”/Library/Preferences/SystemConfiguration/
Find and select the following files that are located within the now open SystemConfiguration foldercom.apple.airport.preferences.plistcom.apple.network.eapolclient.configuration.plistcom.apple.wifi.message-tracer.plistNetworkInterfaces.plistpreferences.plist
- Drag those files into the folder “WiFiConfigBackup” you created in the second step (alternatively, if you’re advanced, have a backup, and know what you’re doing, you can remove them)
- Restart the Mac by going to the Apple menu and choosing “Restart”, then let the Mac boot up as usual
- Return to the Wi-Fi menu in the upper right corner and choose “Turn Wi-Fi On”, and then join the wireless network as usual
Essentially what this is doing is ditching your old wireless preferences and causing MacOS High Sierra to replace them by generating new wi-fi preferences. For many users, this is sufficient to solve any problems with wifi networking.
If you’re still having wi-fi problems after ditching the preferences and rebooting the Mac, you can try the steps below to create a new network location with custom configuration settings.
Go to the Apple menu and choose “System Preferences”
Select the “Network” panel then choose “Wi-Fi” from the list
Near the top of the preference panel, pull down the “Location” menu and select “Edit Locations” from the dropdown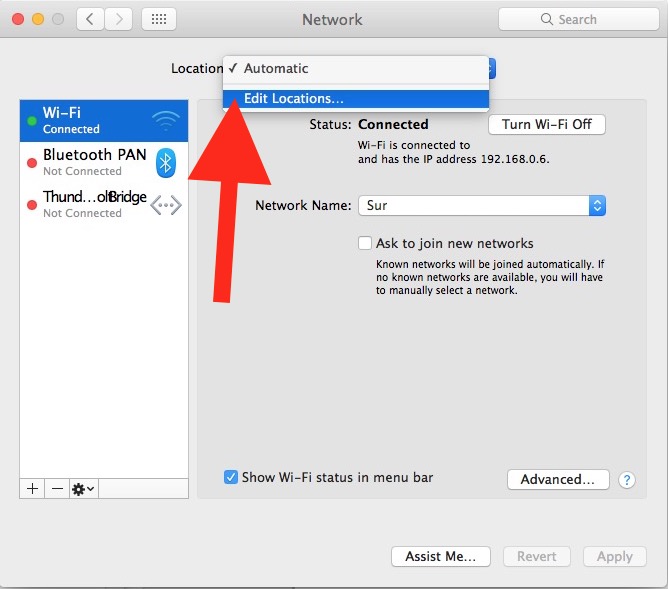
Click the [+] plus button to create a new network location, name it something like “FixWiFiCustomConfig” or whatever is easily identifiable to you, then click on “Done”
Alongside Network Name, pull down the dropdown menu and select the wi-fi network to join, enter the password if applicable
Click on the “Advanced” button in the corner of the Network preference panel
Choose the “TCP/ IP” tab and click on “Renew DHCP Lease”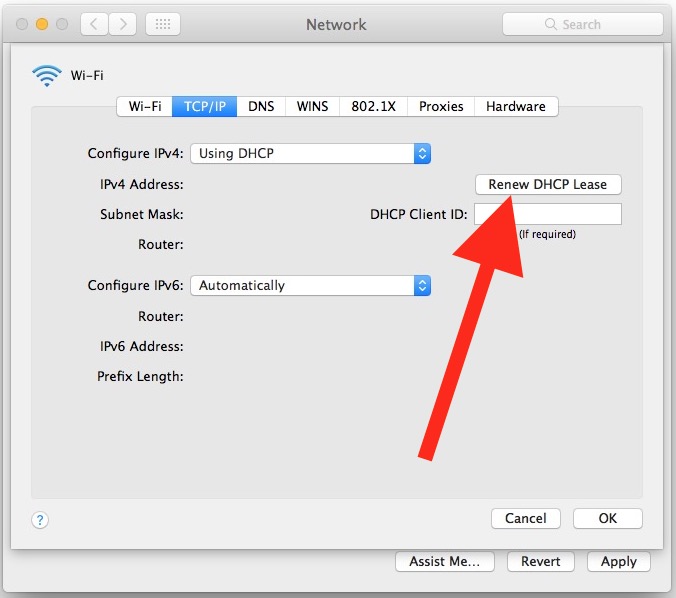
Next go to the “DNS” tab, and within the “DNS Servers” section click on the [+] plus button then add the following IP addresses (one entry per line, by the way these are Google DNS servers, you can use others if you’d prefer but these are particularly easy to remember and ubiquitous):8.8.8.88.8.4.4
 Next, select the “Hardware” tab and set the ‘Configure’ option to “Manually”
Adjust the “MTU” option to “Custom” and set the number to “1453”
Next, select the “Hardware” tab and set the ‘Configure’ option to “Manually”
Adjust the “MTU” option to “Custom” and set the number to “1453”
- Now click on “OK”
- Finally, click on “Apply” to set the network changes you just made for the new network location
- Exit out of System Preferences
- Open Safari or Chrome, and visit a website – it should load fine
This sequence of trashing wi-fi preferences, generating new wireless preferences, and then, if need be, creating a new network location with custom DNS and MTU are a longstanding set of steps for resolving various wireless problems in many versions of Mac OS, including Sierra, El Capitan, and before.
If you’ve done all of the above and you’re still having issues with wireless networking, you can try some general troubleshooting tips too;
- Try to connect to a completely different wi-fi network, if wi-fi works fine with other networks it could be an issue with the router
- Connect a completely different device to the same wi-fi router, does it work fine?
- Try adjusting the wi-fi router channel, or using 2.4GHZ instead of 5GHZ (or vice versa)
If all else fails and wi-fi worked fine before using High Sierra, you can downgrade macOS High Sierra to a prior version of macOS assuming you made a backup with Time Machine before updating to High Sierra. Downgrading is rather dramatic and should be considered a last resort